Let's make simple, player controllable aircraft.
I used ship model from here:
https://www.assetstore.unity3d.com/en/?stay#!/content/29459
And buildings models from here:
https://www.assetstore.unity3d.com/en/?stay#!/content/66885
First, let's prepare our ship object. Put your ship model in the scene (make sure it's positioned in front of the camera), add Rigidbody and Mesh Collider components to it. Make sure to set parameters marked in red accordingly.

Our ship wont do much just yet, we need a way to control it. Aircrafts have three principal axes that can be controlled, pitch, yaw and roll:
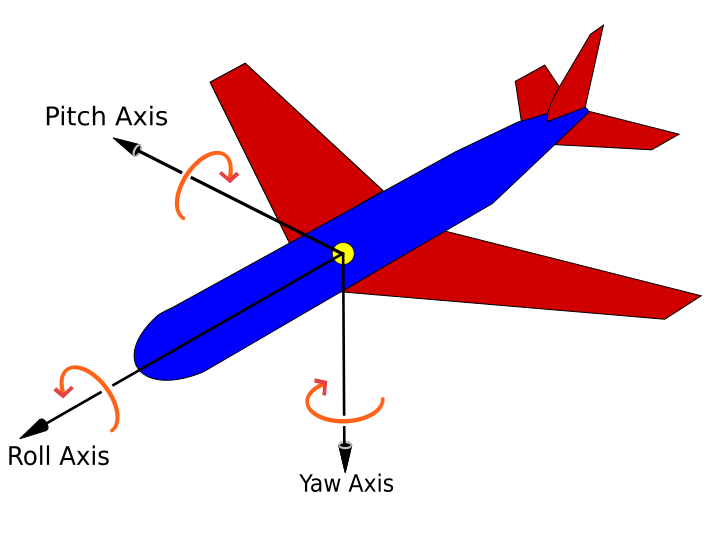
Lets start with controls for pitch and roll first. Create new script, 'PlayerShip.cs', and add it to our ship. Here is how it should look like:
using UnityEngine;

public class PlayerShip : MonoBehaviour
{
    // Max torque for roll
    public float rollTorque = 100;

    // Max torque for pitch
    public float pitchTorque = 50;

    // Reference to our Rigidbody to use later
    private Rigidbody rb;

    // Use this for initialization
    void Start()
    {
        // Find our Rigidbody
        rb = GetComponent<Rigidbody>();

        // AddRelatioveTorque sometimes acts weird if this isn't reset...
        rb.inertiaTensorRotation = Quaternion.identity;
    }

    // FixedUpdate is called every Time.fixedDeltaTime
    void FixedUpdate()
    {
        // Get value of horizontal axis (left/right arrow or a/d keys),
        // returns value in range [-1.0f, 1.0f]
        var h = Input.GetAxis("Horizontal");

        // Get value of vertical axis (up/down arrow or w/s keys)
        var v = Input.GetAxis("Vertical");

        // Add torque along each axes
        rb.AddRelativeTorque(v * pitchTorque, 0, -h * rollTorque
            , ForceMode.Force);
    }
}
With this script assigned to our ship, you should be able to rotate it along x and z axes. It's still not very exciting though... Let's make our ship move. Declare parameter thrust of type float, give it default value of 50, and add this line to our FixedUpdate method:
// Add some forward thrust
rb.AddRelativeForce(Vector3.forward * thrust, ForceMode.Force);
Your PlayerShip script should look like this:
using UnityEngine;

public class PlayerShip : MonoBehaviour
{
    // Max torque for roll
    public float rollTorque = 100;

    // Max torque for pitch
    public float pitchTorque = 50;

    // Thrust
    public float thrust = 50;

    // Reference to our Rigidbody to use later
    private Rigidbody rb;

    // Use this for initialization
    void Start()
    {
        // Find our Rigidbody
        rb = GetComponent<Rigidbody>();

        // AddRelatioveTorque sometimes acts weird if this isn't reset...
        rb.inertiaTensorRotation = Quaternion.identity;
    }

    // FixedUpdate is called every Time.fixedDeltaTime
    void FixedUpdate()
    {
        // Get value of horizontal axis (left/right arrow or a/d keys),
        // returns value in range [-1.0f, 1.0f]
        var h = Input.GetAxis("Horizontal");

        // Get value of vertical axis (up/down arrow or w/s keys)
        var v = Input.GetAxis("Vertical");

        // Add torque along each axes
        rb.AddRelativeTorque(v * pitchTorque, 0, -h * rollTorque
            , ForceMode.Force);

        // Add some forward thrust
        rb.AddRelativeForce(Vector3.forward * thrust, ForceMode.Force);
    }
}
It's probably good idea to make camera child to our ship object, so it will follow it. I also changed camera's Field of View to 90, so its easier to see where we are going.

If all went good, you should be able to fly around. However, controlling our aircraft is a bit awkward, since we don't have any control over 'yaw' axis. Normally you control it with rudder, but since we don't want to over-complicate our controls, we are going to cheat a bit. We will add some amount of yaw automatically depending on our roll angle. Add parameter yawTorque with default value of 50, and add these lines to FixedUpdate method:
// Calculate cosine of our 'roll' angle
var dot = Vector3.Dot(-transform.right, Vector3.up);

// Add some yaw depending on roll angle
rb.AddTorque(0, dot * yawTorque, 0, ForceMode.Force);
As a finishing touch, let's restart our game if we crash into something. Add following method to PlayerShip class:
// What should happen if we collide with something
private void OnCollisionEnter(Collision collision)
{
    // Lets just reload our scene
    SceneManager.LoadScene(SceneManager.GetActiveScene().name);
}
If your ship doesn't want to collide with anything, make sure all of your scenery objects have some kind of colliders assigned.
Final PlayerShip.cs should look like this:
using UnityEngine;
using UnityEngine.SceneManagement;

public class PlayerShip : MonoBehaviour
{
    // Max torque for roll
    public float rollTorque = 100;

    // Max torque for yaw
    public float yawTorque = 20;

    // Max torque for pitch
    public float pitchTorque = 50;

    // Thrust
    public float thrust = 50;

    // Reference to our Rigidbody to use later
    private Rigidbody rb;

    // Use this for initialization
    void Start()
    {
        // Find our Rigidbody
        rb = GetComponent<Rigidbody>();

        // AddRelatioveTorque sometimes acts weird if this isn't reset...
        rb.inertiaTensorRotation = Quaternion.identity;
    }

    // FixedUpdate is called every Time.fixedDeltaTime
    void FixedUpdate()
    {
        // Get value of horizontal axis (left/right arrow or a/d keys),
        // returns value in range [-1.0f, 1.0f]
        var h = Input.GetAxis("Horizontal");

        // Get value of vertical axis (up/down arrow or w/s keys)
        var v = Input.GetAxis("Vertical");

        // Add torque along each axes
        rb.AddRelativeTorque(v * pitchTorque, 0, -h * rollTorque
            , ForceMode.Force);

        // Calculate cosine of our 'roll' angle
        var dot = Vector3.Dot(-transform.right, Vector3.up);

        // Add some yaw depending on roll angle
        rb.AddTorque(0, dot * yawTorque, 0, ForceMode.Force);

        // Add some forward thrust
        rb.AddRelativeForce(Vector3.forward * thrust, ForceMode.Force);
    }

    // What should happen if we collide with something
    private void OnCollisionEnter(Collision collision)
    {
        // Lets just reload our scene
        SceneManager.LoadScene(SceneManager.GetActiveScene().name);
    }
}
And our ship's parameters should look like this:

Congratulations, you made your ship fly! If you'd like to see how final thing looks like, click
here
and wait for it to load :3
As an optional step, if you'd like your ship to self stabilize by trying to go back to horizontal orientation, you can add this script to it.
using UnityEngine;

public class Stabilize : MonoBehaviour
{
    // How much to push object into desired orientation.
    // If your object oscilates too much, add some Angular Drag in the rigidbody.
    public float torque = 100;

    // Reference to our Rigidbody to use later
    private Rigidbody rb;

    // Use this for initialization
    void Start()
    {
        rb = GetComponent<Rigidbody>();
    }

    // FixedUpdate is called every Time.fixedDeltaTime
    void FixedUpdate()
    {
        Vector3 targetDirection = Vector3.up;

        // get its cross product, which is the axis of rotation to
        // get from one vector to the other
        Vector3 cross = Vector3.Cross(transform.up, targetDirection);

        // apply torque along that axis according to the magnitude of the cross product
        // and maximum torque.
        rb.AddTorque(cross * torque);
    }
}

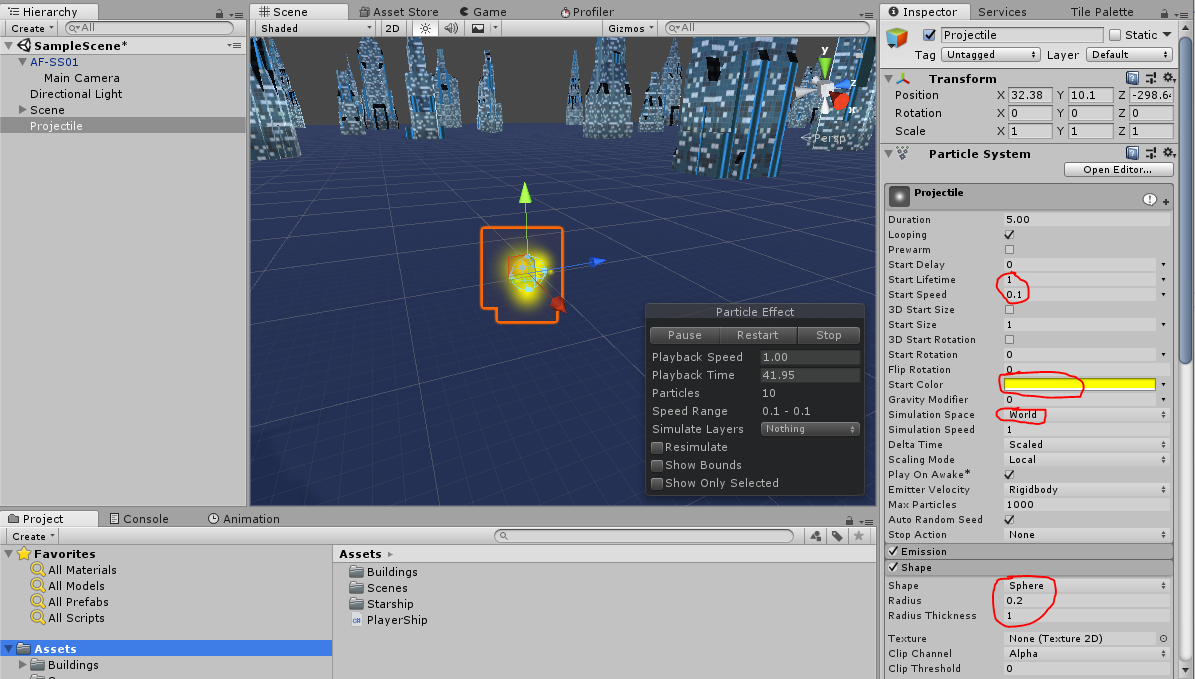
 Next, we should create a script for our projectile, lets call it Projectile.cs
 It's time to make a gun. Create new script, Gun.cs:
 Congratulations, now your ship is armed! Feel free to experiment with adding multiple guns, changing rate of fire or improving visuals of projectiles.


