Wednesday, October 24, 2018

2D Platformer Character 3 / 4 - Win and Lose

This time, we are going to make a real game out of our little 2D cat project. First, lets enable player to lose our game by touching 'bad' platforms. We need a way to tell our scripts which platform we hit. There are many ways to do it, simplest is to create a Tag, lets call it 'Kill', and then assign it to every object that we want to cause player death.

Duplicate platform we have in the scene, change its color to red so it looks differently (or you can just use different bitmap if you have one). It's good idea to rename it too, for example to 'kill block'. When it's done, create new Tag 'Kill' and assign it to our new platform. Next, add these two methods to the PlyerCat.cs script
// What should happen if we collide with anything
private void OnCollisionEnter2D(Collision2D collision)
{
    // If we touched object with a 'Kill' Tag
    if (collision.collider.CompareTag("Kill"))
    {
        // Disable player GameObject
        gameObject.SetActive(false);
 
        // Restart after one second
        Invoke("Restart", 1);
    }
}
 
// Handy method for restarting current scene
private void Restart()
{
    SceneManager.LoadScene(SceneManager.GetActiveScene().name);
}
If Visual Studio haven't done it for you, add this clause at the beginning of the PlayerCat.cs script:
using UnityEngine.SceneManagement;
Now when you touch red platform, game should restart after one second.

Before we'll enable player to win our game, let's make more platforms. It's good idea to make prefab out of everything we are going to use multiple times in our scene. That way, if we'll need to change anything later, it will be enough to change one prefab, and every object created out of it will update automatically. Create prefab out of our block by dragging it from scene into Assets window. 
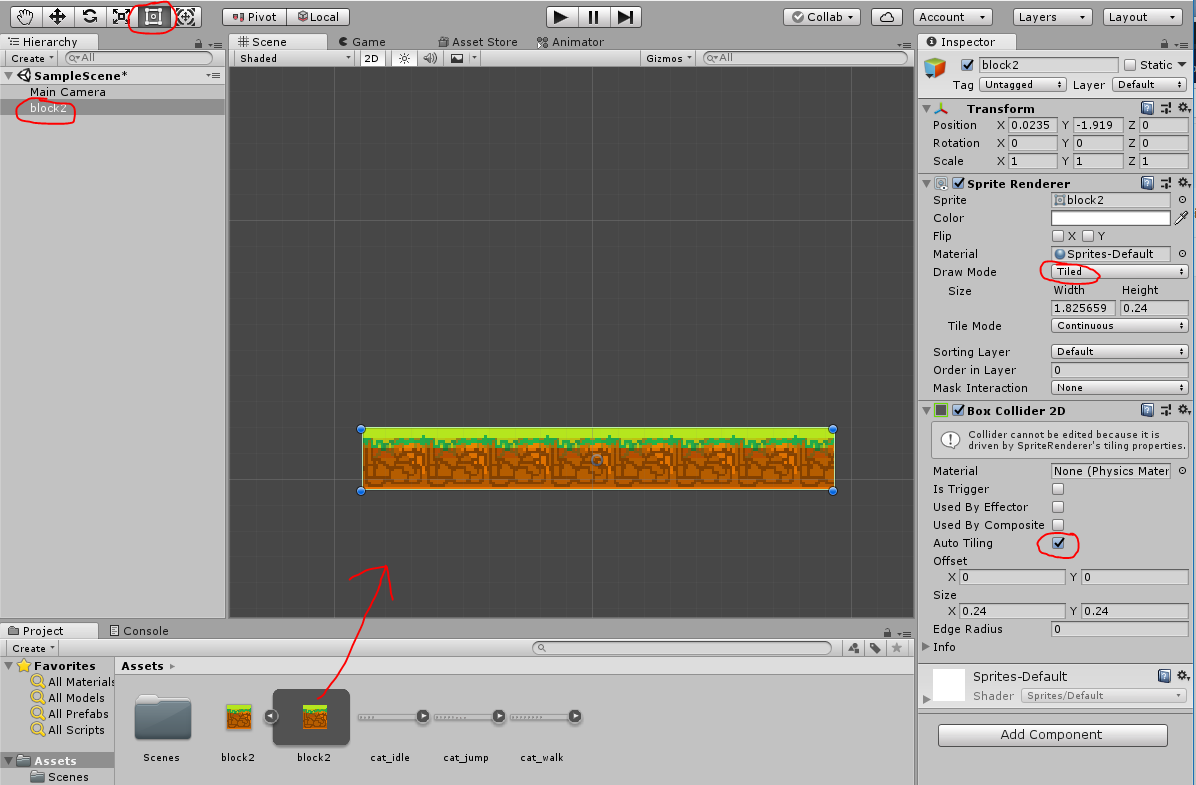
Now we can finally create more platforms to make our level more interesting. If you try to play now, you will notice that player has tendency to 'stick' to platforms sides. That's because platforms have friction, we need to disable it from sides. Select your platform prefab, add Platform Effector 2D and set everything like in following screenshot. That should prevent player from sticking to the sides.

Let's enable player to win our game! Like before, make another platform, change its color to green, create and assign 'Victory' Tag to it, and change it's name to 'victory block'. Let's also create some kind of victory screen so player knows they actually won. I just made simple sign for it by using www.textfx.co generator. When you put it in the scene, make sure to set 'Order in Layer' to some big number (like 100), that way it will be always displayed in front of everything. Now lets change PlayerCat.cs script to show our victory sign when player touches platform with 'Victory' Tag, and restart the game after 5 seconds.
using UnityEngine;
using UnityEngine.SceneManagement;
 
public class PlayerCat : MonoBehaviour
{
    // How strong force to apply for sidewise movement
    public float movementForce = 15;
 
    // How strong force to apply for jump
    public float jumpForce = 5;
 
    // Where should we check for ground
    public Transform groundCheck;
 
    // Are we standing on the ground?
    private bool grounded;
 
    // Victory Screen
    public GameObject victoryScreen;
 
    // References for various components to use later
    private SpriteRenderer sr;
    private Rigidbody2D rb;
    private Animator anim;
 
    // Use this for initialization
    void Start()
    {
        // Find our components
        sr = GetComponent<SpriteRenderer>();
        rb = GetComponent<Rigidbody2D>();
        anim = GetComponent<Animator>();
 
        // Disable it initially
        victoryScreen.SetActive(false);
    }
 
    // Update is called once per frame
    void Update()
    {
        // Lets see if we are standing on something
        grounded = Physics2D.OverlapPoint(groundCheck.position) != null;
 
        // Jump only when we are grounded
        if (Input.GetButtonDown("Jump") && grounded)
        {
            anim.SetTrigger("Jump");
            rb.AddForce(Vector2.up * jumpForce, ForceMode2D.Impulse);
        }
 
        // Set Speed parameter to absolute value of our horizontal speed
        anim.SetFloat("Speed"Mathf.Abs(rb.velocity.x));
 
        // Set Grounded animator parameter
        anim.SetBool("Grounded", grounded);
    }
 
    // FixedUpdate is called every Time.fixedDeltaTime
    void FixedUpdate()
    {
        // Get value of horizontal axis (left/right arrow or a/d keys),
        // returns value in range [-1.0f, 1.0f]
        var h = Input.GetAxis("Horizontal");
 
        // Flip sprite depending on horizontal input
        if (h < 0.0f)
            sr.flipX = true;
        if (h > 0.0f)
            sr.flipX = false;
 
        // Move player according to horizontal axis
        rb.AddForce(Vector2.right * h * movementForce, ForceMode2D.Force);
    }
 
    // What should happen if we collide with anything
    private void OnCollisionEnter2D(Collision2D collision)
    {
        // If we touched object with a 'Kill' Tag
        if (collision.collider.CompareTag("Kill"))
        {
            // Disable player GameObject
            gameObject.SetActive(false);
 
            // Restart after one second
            Invoke("Restart", 1);
        }
 
        // If we touched object with a 'Victory' Tag
        if (collision.collider.CompareTag("Victory"))
        {
            // Stop player from moving
            rb.simulated = false;
            rb.velocity = Vector2.zero;
 
            // Show victory screen
            victoryScreen.SetActive(true);
 
            // Restart after five seconds
            Invoke("Restart", 5);
        }
    }
 
    // Handy method for restarting current scene
    private void Restart()
    {
        SceneManager.LoadScene(SceneManager.GetActiveScene().name);
    }
}
We still need to tell PlayerCat script where is our victory sign. Select our cat character, and then drag victory sign to 'Victory Screen' property of PlayerCat script. Congratulation, you now have fully functional game :3

Tuesday, October 23, 2018

2D Platformer Character 2 / 4 - Jumping

Lets teach our cat how to jump. First, we need to modify PlayerCat.cs script.
using UnityEngine;
 
public class PlayerCat : MonoBehaviour
{
    // How strong force to apply for sidewise movement
    public float movementForce = 15;
 
    // How strong force to apply for jump
    public float jumpForce = 5;
 
    // Where should we check for ground
    public Transform groundCheck;
 
    // Are we standing on the ground?
    private bool grounded;
 
    // References for various components to use later
    private SpriteRenderer sr;
    private Rigidbody2D rb;
    private Animator anim;
 
    // Use this for initialization
    void Start()
    {
        // Find our components
        sr = GetComponent<SpriteRenderer>();
        rb = GetComponent<Rigidbody2D>();
        anim = GetComponent<Animator>();
    }
 
    // Update is called once per frame
    void Update()
    {
        // Lets see if we are standing on something
        grounded = Physics2D.OverlapPoint(groundCheck.position) != null;
 
        // Jump only when we are grounded
        if (Input.GetButtonDown("Jump") && grounded)
        {
            rb.AddForce(Vector2.up * jumpForce, ForceMode2D.Impulse);
        }
 
        // Set Speed parameter to absolute value of our horizontal speed
        anim.SetFloat("Speed"Mathf.Abs(rb.velocity.x));
    }
 
    // FixedUpdate is called every Time.fixedDeltaTime
    void FixedUpdate()
    {
        // Get value of horizontal axis (left/right arrow or a/d keys),
        // returns value in range [-1.0f, 1.0f]
        var h = Input.GetAxis("Horizontal");
 
        // Flip sprite depending on horizontal input
        if (h < 0.0f)
            sr.flipX = true;
        if (h > 0.0f)
            sr.flipX = false;
 
        // Move player according to horizontal axis
        rb.AddForce(Vector2.right * h * movementForce, ForceMode2D.Force);
    }
}
Then, add empty GameObject to the cat, rename it to GroundCheck and place it right below cat's Capsule Collider. Now, select cat GameObject and drag your new GroundCheck into Ground Check property of PlayerCat.cs script. If all went good, you should have a jumpy cat!

Lets make jumps look nicer by adding different animation for when the cat is in the air. Prepare cat_jump bitmap like before, by slicing it and creating animation out of it. This time, make animation only out of 3rd and 4th frames. Like before, you can delete cat_jump_2 GameObject and cat_jump_2 Animator that unity created. Open cat Animator and add another parameter to it of type bool this time and call it 'Grounded'. Also add your new 'cat_jump' animation to it and make two new transitions to it, one from 'cat_idle' state and one from 'cat_walk' state. Set them up like in screenshot below. Just make sure you set parameters for both of them. Add one more transition, from cat_jump to cat_idle this time, so our cat can land. And finally, modify Update method of PlayerCat.cs script to look like this.
 
    // Update is called once per frame
    void Update()
    {
        // Lets see if we are standing on something
        grounded = Physics2D.OverlapPoint(groundCheck.position) != null;
 
        // Jump only when we are grounded (Space key by default)
        if (Input.GetButtonDown("Jump") && grounded)
        {
            rb.AddForce(Vector2.up * jumpForce, ForceMode2D.Impulse);
        }
 
        // Set Speed parameter to absolute value of our horizontal speed
        anim.SetFloat("Speed"Mathf.Abs(rb.velocity.x));
 
        // Set Grounded animator parameter
        anim.SetBool("Grounded", grounded);
    }
Congratulations, you taught our cat how to jump properly :3

Of course we could continue improving our jump by adding animation for beginning of the jump and landing, but its not really necessary and it would complicate cat Animator. If you are curious how much, take a look at one that has them implemented. If you are up for a challenge, you can try to figure out how to implement it all by yourself :3

2D Platformer Character 1 / 4 - Basic Movement

Lets make a character for simple 2D platformer type game. I prepared archive with all needed bitmaps here, but feel free to use your own. I used sprite sheet for a cat from opengameart.org, while platform graphics was made by one of super talented participants of our workshop.
Create new 2D project and put all bitmaps in Assets folder. Lets start with making some ground for our character to walk on. Since we want our block to be tiled, we need to change 'Mesh Type' in its import settings to Full Rect. Additionally, change 'Filter Mode' to point if you are going for pixelated look. Once its done, you can put your ground in the scene. Change 'Draw Mode' to Tiled, which will enable you to extend ground as much as you want (with the marked tool in upper left corner), and bitmap will just tile automatically. Also, add Box Collider 2D and check it's 'Auto Tiling' property, so our player wont fall through the ground.
Now we can prepare player character sprite by slicing it. Select cat_idle bitmap, change 'Sprite Mode' to Multiple, and click on the 'Sprite Editor' button. You can also change 'Filter Mode' to Point too if you prefer pixelated look. Within Sprite Editor, open Slice menu and set slicing parameters. We know that each frame in our sprite sheet has size of 64x64 pixels, so it's easiest to pick 'Grid By Cell Size' and set cell size to 64x64. Press Slice when you are done and you can close Sprite Editor. Now we can finally add sprite of our player character to the scene. Select all 4 frames of our 'cat_idle' animation (with SHIFT key) and just drag them into the scene. Unity will ask you for name of new animation, name it cat_idle. If you now enter play mode, you should see your character playing 'idle' animation. However, it might look a bit too small, because most likely camera has incorrect size. Unfortunately, correct size will vary depend on game's window size. On the bright side, we can make script that will update camera automatically. Create and add following script PixelCamera.cs to your Main Camera in the scene.
using UnityEngine;
 
[ExecuteInEditMode]
public class PixelCamera : MonoBehaviour
{
    void Update()
    {
        var c = GetComponent<Camera>();
        if (c != null && c.orthographic)
        {
            c.orthographicSize = Screen.height / 200.0f;
        }
    }
}
Now our game should look nice and crisp. It's time to make our player move around. First, create script PlayerCat.cs
using UnityEngine;
 
public class PlayerCat : MonoBehaviour
{
    public float movementForce = 15;
 
    // References for various components to use later
    private SpriteRenderer sr;
    private Rigidbody2D rb;
 
    // Use this for initialization
    void Start()
    {
        // Find our components
        sr = GetComponent<SpriteRenderer>();
        rb = GetComponent<Rigidbody2D>();
    }
 
    // Update is called once per frame
    void Update()
    {
    }
 
    // FixedUpdate is called every Time.fixedDeltaTime
    void FixedUpdate()
    {
        // Get value of horizontal axis (left/right arrow or a/d keys),
        // returns value in range [-1.0f, 1.0f]
        var h = Input.GetAxis("Horizontal");
 
        // Flip sprite depending on horizontal input
        if (h < 0.0f)
            sr.flipX = true;
        if (h > 0.0f)
            sr.flipX = false;
 
        // Move player according to horizontal axis
        rb.AddForce(Vector2.right * h * movementForce, ForceMode2D.Force);
    }
}
Select our player GameObject (it's probably still called 'cat_idle_0') and change its name to something sensible, like 'cat'. Then, add 'Rigidbody 2D', 'Capsule Collider 2D' and our new PlayerCat.cs script to it. Make sure to set marked parameters accordingly, although feel free to experiment with them, especially with 'Linear Drag' and 'Movement Force'. If all went good, you should be able to move your character around with arrow or a/d keys. Currently, our cat just slides around instead of walking, let's make them walk. Prepare cat_walk animation in exactly the same way like you did with cat_idle, by slicing it and then dragging all frames into the scene, and calling new animation 'cat_walk'. You can delete 'cat_walk_0' GameObject from the scene and 'cat_walk_0' Animator from the assets afterwards, since these wont be needed. Now we have to add 'cat_walk' to our animator. If it's still called 'cat_idle_0', rename it to 'cat' and then double click on our animator to open Animator window. Add parameter 'Speed' of type float Drag 'cat_walk' animation into Animator to create new animation state and set it's Speed multiplier to our 'Speed' parameter. Now we need to tell Animator when to change from cat_idle state to cat_walk. Right click on 'cat_idle' select 'Make Transition' and click on the 'cat_walk' to make transition. With new transition selected, uncheck 'Has Exit Time', change 'Transition Duration' to 0, and add new condition, 'Speed > 0.01' to it. Now make opposite transition, just with condition 'Speed < 0.01'. Finally, lets modify PlayerCat.cs script to set Speed parameter in Animator according to character's horizontal velocity.
using UnityEngine;
 
public class PlayerCat : MonoBehaviour
{
    public float movementForce = 15;
 
    // References for various components to use later
    private SpriteRenderer sr;
    private Rigidbody2D rb;
    private Animator anim;
 
    // Use this for initialization
    void Start()
    {
        // Find our components
        sr = GetComponent<SpriteRenderer>();
        rb = GetComponent<Rigidbody2D>();
        anim = GetComponent<Animator>();
    }
 
    // Update is called once per frame
    void Update()
    {
        // Set Speed parameter to absolute value of our horizontal speed
        anim.SetFloat("Speed"Mathf.Abs(rb.velocity.x));
    }
 
    // FixedUpdate is called every Time.fixedDeltaTime
    void FixedUpdate()
    {
        // Get value of horizontal axis (left/right arrow or a/d keys),
        // returns value in range [-1.0f, 1.0f]
        var h = Input.GetAxis("Horizontal");
 
        // Flip sprite depending on horizontal input
        if (h < 0.0f)
            sr.flipX = true;
        if (h > 0.0f)
            sr.flipX = false;
 
        // Move player according to horizontal axis
        rb.AddForce(Vector2.right * h * movementForce, ForceMode2D.Force);
    }
}
Congratulations, you now have animated 2D character. In next part, we will teach our cat how to jump :3

Sunday, October 21, 2018

Physics based aircraft 2 / 2 - Gun

Lets arm our aircraft from previous tutorial with a simple gun. We will need two scripts (one for a gun and one for a projectile), and also a prefab for projectile itself. For projectile, we'll use Particle System. It's very useful and powerful component, you can read about it here if you are curious. But for now, just create one and set it up according to these screenshots: Next, we should create a script for our projectile, lets call it Projectile.cs
using UnityEngine;
 
public class Projectile : MonoBehaviour
{
    // Reference to our Rigidbody to use later
    private Rigidbody rb;
 
    // Reference to our ParticleSystem to use later
    private ParticleSystem ps;
 
    // Use this for initialization
    void Start()
    {
        // Find our Rigidbody
        rb = GetComponent<Rigidbody>();
 
        // Find our ParticleSystem
        ps = GetComponent<ParticleSystem>();
 
        // Make sure our projectile disappears eventually
        // even if dont hit anything
        Invoke("Die", 5);
    }
 
    // Destroy nicely our projectile
    void Die()
    {
        // Stop emiting particles
        ps.Stop();
 
        // Disable collisions
        rb.detectCollisions = false;
 
        // Actually destroy after 2 seconds (to let particle emitter finish)
        Destroy(gameObject, 2);
    }
 
    // What should happen if we collide with something
    private void OnCollisionEnter(Collision collision)
    {
        // Disable inheriting velocity
        var iv = ps.inheritVelocity;
        iv.enabled = false;
 
        // Emit some particles to simulate impact
        for (int i = 0; i < 20; i++)
        {
            ps.Emit(new ParticleSystem.EmitParams()
            { velocity = collision.contacts[0].normal + Random.onUnitSphere * 2 }, 1);
        }
 
        // Destroy our projectile
        Die();
    }
}
Now we can add Rigidbody, Sphere Collider and our new Projectile script. Set them up according to next screenshot, and create prefab out of our Projectile by dragging it from the Hierarchy window on the left to the Assets window on the bottom (you can delete projectile from the scene afterwards). It's time to make a gun. Create new script, Gun.cs:
using UnityEngine;
 
public class Gun : MonoBehaviour
{
    //Our projectile prefab
    public Rigidbody projectilePrefab;
 
    //How fast projectiles will go
    public float initialVelocity = 100.0f;
 
    // How often our gun can fire
    public float fireDelay = 0.25f;
 
    // How much time since last shoot
    private float t = 0;
 
    // Reference to our Rigidbody to use later
    private Rigidbody rb;
 
    // Use this for initialization
    void Start()
    {
        // Find our Rigidbody
        rb = GetComponentInParent<Rigidbody>();
    }
 
    // Update is called once per frame
    void Update()
    {
        // Increase our shoot timer
        t += Time.deltaTime;
 
        // If it isn't too early and we are pressing Fire1 button (left CTRL by default)
        if (t > fireDelay && Input.GetButton("Fire1"))
        {
            // Reset shoot timer
            t = 0;
 
            // Instantiate our projectile and send it flying
            var pr = Instantiate(projectilePrefab, transform.position, transform.rotation);
            pr.velocity = transform.forward * initialVelocity;
 
            // If we have a rigidbody, projectile should inherit it's velocity
            if (rb != null)
            {
                pr.velocity += rb.velocity;
            }
        }
    }
}
Lets install our new gun into our ship. Create empty GameObject as a child of our ship, rename it to Gun and position it in front of the ship. Make sure it's quite far from the ship's own collider, or else you might fly right into the projectile you just launched and kill yourself... It will launch projectiles in the direction of blue arrow, so make sure it's rotated correctly too.

When you are done, add Gun.cs script to our new GameObject and drag Projectile prefab into 'Projectile Prefab' field of our gun: Congratulations, now your ship is armed! Feel free to experiment with adding multiple guns, changing rate of fire or improving visuals of projectiles.

Saturday, October 20, 2018

Physics based aircraft 1 / 2 - Basic Movement

Let's make simple, player controllable aircraft.

I used ship model from here:
https://www.assetstore.unity3d.com/en/?stay#!/content/29459
And buildings models from here:
https://www.assetstore.unity3d.com/en/?stay#!/content/66885

First, let's prepare our ship object. Put your ship model in the scene (make sure it's positioned in front of the camera), add Rigidbody and Mesh Collider components to it. Make sure to set parameters marked in red accordingly.

Our ship wont do much just yet, we need a way to control it. Aircrafts have three principal axes that can be controlled, pitch, yaw and roll: Lets start with controls for pitch and roll first. Create new script, 'PlayerShip.cs', and add it to our ship. Here is how it should look like:
using UnityEngine;
 
public class PlayerShip : MonoBehaviour
{
    // Max torque for roll
    public float rollTorque = 100;
 
    // Max torque for pitch
    public float pitchTorque = 50;
 
    // Reference to our Rigidbody to use later
    private Rigidbody rb;
 
    // Use this for initialization
    void Start()
    {
        // Find our Rigidbody
        rb = GetComponent<Rigidbody>();
 
        // AddRelatioveTorque sometimes acts weird if this isn't reset...
        rb.inertiaTensorRotation = Quaternion.identity;
    }
 
    // FixedUpdate is called every Time.fixedDeltaTime
    void FixedUpdate()
    {
        // Get value of horizontal axis (left/right arrow or a/d keys),
        // returns value in range [-1.0f, 1.0f]
        var h = Input.GetAxis("Horizontal");
 
        // Get value of vertical axis (up/down arrow or w/s keys)
        var v = Input.GetAxis("Vertical");
 
        // Add torque along each axes
        rb.AddRelativeTorque(v * pitchTorque, 0, -h * rollTorque
            , ForceMode.Force);
    }
}
With this script assigned to our ship, you should be able to rotate it along x and z axes. It's still not very exciting though... Let's make our ship move. Declare parameter thrust of type float, give it default value of 50, and add this line to our FixedUpdate method:
// Add some forward thrust
rb.AddRelativeForce(Vector3.forward * thrust, ForceMode.Force);
Your PlayerShip script should look like this:
using UnityEngine;
 
public class PlayerShip : MonoBehaviour
{
    // Max torque for roll
    public float rollTorque = 100;
 
    // Max torque for pitch
    public float pitchTorque = 50;
 
    // Thrust
    public float thrust = 50;
 
    // Reference to our Rigidbody to use later
    private Rigidbody rb;
 
    // Use this for initialization
    void Start()
    {
        // Find our Rigidbody
        rb = GetComponent<Rigidbody>();
 
        // AddRelatioveTorque sometimes acts weird if this isn't reset...
        rb.inertiaTensorRotation = Quaternion.identity;
    }
 
    // FixedUpdate is called every Time.fixedDeltaTime
    void FixedUpdate()
    {
        // Get value of horizontal axis (left/right arrow or a/d keys),
        // returns value in range [-1.0f, 1.0f]
        var h = Input.GetAxis("Horizontal");
 
        // Get value of vertical axis (up/down arrow or w/s keys)
        var v = Input.GetAxis("Vertical");
 
        // Add torque along each axes
        rb.AddRelativeTorque(v * pitchTorque, 0, -h * rollTorque
            , ForceMode.Force);
 
        // Add some forward thrust
        rb.AddRelativeForce(Vector3.forward * thrust, ForceMode.Force);
    }
}
It's probably good idea to make camera child to our ship object, so it will follow it. I also changed camera's Field of View to 90, so its easier to see where we are going.
If all went good, you should be able to fly around. However, controlling our aircraft is a bit awkward, since we don't have any control over 'yaw' axis. Normally you control it with rudder, but since we don't want to over-complicate our controls, we are going to cheat a bit. We will add some amount of yaw automatically depending on our roll angle. Add parameter yawTorque with default value of 50, and add these lines to FixedUpdate method:
// Calculate cosine of our 'roll' angle
var dot = Vector3.Dot(-transform.right, Vector3.up);
 
// Add some yaw depending on roll angle
rb.AddTorque(0, dot * yawTorque, 0, ForceMode.Force);
As a finishing touch, let's restart our game if we crash into something. Add following method to PlayerShip class:
// What should happen if we collide with something
private void OnCollisionEnter(Collision collision)
{
    // Lets just reload our scene
    SceneManager.LoadScene(SceneManager.GetActiveScene().name);
}
If your ship doesn't want to collide with anything, make sure all of your scenery objects have some kind of colliders assigned.
Final PlayerShip.cs should look like this:
using UnityEngine;
using UnityEngine.SceneManagement;
 
public class PlayerShip : MonoBehaviour
{
    // Max torque for roll
    public float rollTorque = 100;
 
    // Max torque for yaw
    public float yawTorque = 20;
 
    // Max torque for pitch
    public float pitchTorque = 50;
 
    // Thrust
    public float thrust = 50;
 
    // Reference to our Rigidbody to use later
    private Rigidbody rb;
 
    // Use this for initialization
    void Start()
    {
        // Find our Rigidbody
        rb = GetComponent<Rigidbody>();
 
        // AddRelatioveTorque sometimes acts weird if this isn't reset...
        rb.inertiaTensorRotation = Quaternion.identity;
    }
 
    // FixedUpdate is called every Time.fixedDeltaTime
    void FixedUpdate()
    {
        // Get value of horizontal axis (left/right arrow or a/d keys),
        // returns value in range [-1.0f, 1.0f]
        var h = Input.GetAxis("Horizontal");
 
        // Get value of vertical axis (up/down arrow or w/s keys)
        var v = Input.GetAxis("Vertical");
 
        // Add torque along each axes
        rb.AddRelativeTorque(v * pitchTorque, 0, -h * rollTorque
            , ForceMode.Force);
 
        // Calculate cosine of our 'roll' angle
        var dot = Vector3.Dot(-transform.right, Vector3.up);
 
        // Add some yaw depending on roll angle
        rb.AddTorque(0, dot * yawTorque, 0, ForceMode.Force);
 
        // Add some forward thrust
        rb.AddRelativeForce(Vector3.forward * thrust, ForceMode.Force);
    }
 
    // What should happen if we collide with something
    private void OnCollisionEnter(Collision collision)
    {
        // Lets just reload our scene
        SceneManager.LoadScene(SceneManager.GetActiveScene().name);
    }
}
And our ship's parameters should look like this: Congratulations, you made your ship fly! If you'd like to see how final thing looks like, click here and wait for it to load :3

As an optional step, if you'd like your ship to self stabilize by trying to go back to horizontal orientation, you can add this script to it.
using UnityEngine;
 
public class Stabilize : MonoBehaviour
{
    // How much to push object into desired orientation. 
    // If your object oscilates too much, add some Angular Drag in the rigidbody.
    public float torque = 100;
 
    // Reference to our Rigidbody to use later
    private Rigidbody rb;
 
    // Use this for initialization
    void Start()
    {
        rb = GetComponent<Rigidbody>();
    }
    
    // FixedUpdate is called every Time.fixedDeltaTime
    void FixedUpdate()
    {
        Vector3 targetDirection = Vector3.up;
 
        // get its cross product, which is the axis of rotation to
        // get from one vector to the other
        Vector3 cross = Vector3.Cross(transform.up, targetDirection);
 
        // apply torque along that axis according to the magnitude of the cross product 
        // and maximum torque.
        rb.AddTorque(cross * torque);
    }
}

Monday, October 15, 2018

3D Animations 2 / 2

This time we'll make our tiger walk around. To do that, we are going to make TigerAnimator blend 'idle' and 'walk' animations based on new 'Speed' parameter.

Lets add 'Speed' parameter to our TigerAnimator first.

Then, we should rename our 'idle' state to 'locomotion', and make a blend tree in it.

Double click on 'locomotion' state, it will open our newly created blend tree in animator window. Add 'idle' and 'walk' animations too it. Make sure that Parameter is set to 'Speed'.

We need to change our Tiger.cs script to use 'Speed' parameter. Open it and modify Update method like this.

Now our tiger should walk forward when we press up arrow or 'w' key

What happens when we go backwards though? Our tiger just slides back, that's no good... We don't have 'walk backwards' animation, however, we can just use normal walk animation and play it in reverse. Go back to our blend tree, add 'walk' animation again and set thresholds and speed like here.

Now our tiger can walk backwards! Another small issue is that when we press Fire1 while holding up or down keys, our tiger slides around while roar animation plays. Lets make our tiger stop before roaring. To do that, we have to update our Tiger.cs script again. As a finishing touch, we will also add turning.

Congratulations! You now have animated game character who can walk around and roar at things!

3D Animations 1 / 2

To use animations in unity, you can either make them yourself in the editor, or use a model that already has them. In this example, I used free model with animations from the asset store that you can download here. Alternatively, you can download it straight from the Asset Store, but some assets will have different names.

After placing model in our scene, we should create 'Animator Controller' for it and call it TigerAnimator.
Create 'Animator Controller'

Assign our TigerAnimator to our Tiger model.
Assign TigerAnimator

Now double click on TigerAnimator to open Animator window (you can do that in either Inspector or Project panels).
Animator panel

Find 'idle' animation and drag it into Animator window to create new state.
Creating 'idle' state

If you 'Play' your project now, you should have your model playing animation you picked.
Playing idle animation

Lets add another one. Find 'roar' animation and drag it to the Animator window.
Creating 'roar' state

We need a way to tell our TigerAnimator to play 'roar' animation. To do that, we need to add parameter of type 'trigger', and then use it in transition from idle state to roar state.
Roar trigger

To create new transition, right click on 'idle' state, pick 'Make Transition', and connect it to 'roar' state.
Creating transition from 'idle' to 'roar' state

Select our new transition and add 'Roar' trigger as new condition to it. That way it will play whenever we fire 'Roar' trigger from script. Also disable 'Has Exit Time' option, since we don't want 'roar' state to wait till idle animation is finished.
Setting up transition


Now we can add script to control out Tiger. With our Tiger model in the scene selected, click on The Add Component button and select 'New script'. Lets name it Tiger.
Adding Tiger.cs script
Open our newly created Tiger.cs script by double clicking on it (Visual Studio might take few seconds to start), and make it look like this.


Now when you 'Play' your project, tiger should play 'roar' animation when you press Fire1 button

There is a problem though, our tiger never stops roaring... We forgot to add transition from 'roar' state back to 'idle' state... Lets fix this! Open animation window, select 'roar' state and make new transition to 'idle' state.
Creating transition back from 'roar' to 'idle' state
Now our tiger should roar only once whenever we press Fire1 button.

As an exercise, you can add 'Attack' animation in the same way, just connect it to Fire2 button instead (left ALT key by default).

In part two, we will make our tiger walk around Part 2